

If you want to learn about solar panels, you've come to the right place! But first, let me ask a quick question...
Are you good at science?
No? Yes? Maybe you didn’t quite make it past high-school level?
Either way, you don't need to worry about it! We've distilled the secrets of how solar panels are made into 8 easy-to-understand steps!
Step 1: Silicon is collected in its raw form -- rocks.
The main ingredient of solar panels is silicon. It's a material used in all sorts of electronic gadgets. Solar panels need the purest silicon possible, which is found in quartz stone and quartzite gravel or sand.
The raw materials are collected at a large quarry and sent to a factory for the next step.

Step 2: The Silicon rocks are melted and purified
The quartzite is melted down at incredibly hot temperatures reaching 2000°C. Dramatically spraying out sparks, it must be handled with extreme care. The molten silicon is then transferred to a cooling unit where it breaks up into shards. This pure silicon is called polysilicon.
Surprisingly, this does not look like the household silicone you plug holes with. These shards are a reflective silver metal and very conductive to electricity.
Step 3: The purified silicon is melted again for conductivity
A chemical called boron dopant is added to the cooled shards of pure polysilicon. This ensures the resulting silicon will have a positive electrical charge. It's transferred to a giant heating vat and melted down again.
This time, the temperatures go up to 2500 °C and it takes two days of cooking before the silicon mix is complete. When it is done, the silicon has transformed into a solid metal cube or cylinder that is sent to the next machine.
Step 4: Paper thin silicon wafers are sliced off
The block of pure silicon is loaded onto a cutting machine that gently saws the silicon into paper thin wafers. These wafers go through a variety of chemical treatments to make them capable of conducting electricity. They are thoroughly cleaned and contain no impurities by the time they are treated.
Finally, blue-purple silicon nitride coats the silicon wafers, giving them their signature blue look. The coating reduces the reflectivity of the wafers, helping them to collect more electricity from the sun.
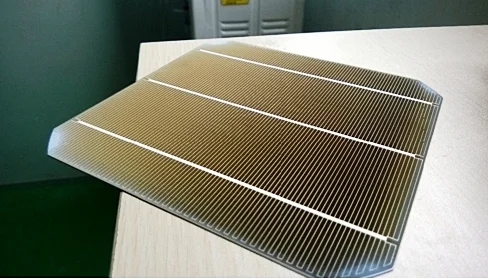
Step 5: Conductive Metals connect the silicon wafers
Thin pinstripes of conductive metals are printed on the surface of the wafers, equipping them with the capacity to collect electricity created. These are the tiny horizontal lines that you see on all finished solar panels.
The wafer is now called a cell and is ready to be joined with other identical cells into a complete panel!
Step 6: Soldering it all together
The cells are very delicate, so all the soldering is done by machine. Thicker bars of conductive material are laid in rows, connecting each cell to another. They first connected in rows, and then columns. The average solar panel is 10 cells long and 6 cells wide. The total number of cells in such a panel is around 60.
Step 7: Adding glass and a metal frame
When the cell assembly is complete, they are sandwiched between two layers of protective glass, protecting the delicate silicone from the elements. A frame is added for structure and easy mounting and a small junction box is attached to the panel for seamless connectivity.
The solar panel is now ready to be connected to other panels and withstand all sorts of weather conditions.
Step 8: Final checks and delivery
The completed solar panel is thoroughly cleaned and undergoes final voltage tests. Once it passes inspection, it's ready to be delivered to your home!
The science behind solar panels was once revolutionary, but now it is becoming the norm. With the help of automatized robotics, we are creating solar panels faster than ever before. Future forecasts predict that solar panels will get cheaper and cheaper as they become even easier to manufacture.
Would you like to try making a fun DIY solar panel? Check out this video to find out how!
Author:

Claire H.
Writer